
Especially in toy photography, most of the time your subject isn’t going to naturally fill the frame. So what should you do with the empty space around the edges? Should we rely on cropping, or try for better composition?
Firstly, cropping is something that’s entirely a matter of personal preference, so don’t take what I tell you here as me saying one way is right or not. The ultimate goal no matter what is to end up with shots that you like the look of when you’re done, and there’s probably more than one way to get there.
I know some photographers are strongly of the belief that cropping should be an action of last resort; something you use only to “rescue” a picture when you didn’t get the initial composition right. But like a lot of things, I think that assumes a more general kind of photography and isn’t necessarily applicable to shooting smaller things on a table with probably a blank background behind it. For me that changes the math a little. But it doesn’t rule out getting by solely with composition.
Fundamentally, no matter what you do, your photo is ultimately going to be a rectangle, whether you crop down to your subject after the fact, or you do your best to frame it for as little extraneous space in the image as you can manage. That helps simplify things a lot, because it brings the two approaches closer to an equivalence. Up to a point, you can pretty much achieve the same end result by going in either direction.
First let’s talk about the question of why we might want to crop a photo to begin with. If you’re photographing an action figure (or in the case of a Transformer, a robot mode) you’re basically guaranteed to have dead space to the left and right no matter how tightly you frame the top and bottom. Now, sometimes inspiration strikes and you come upon a way of framing or staging a shot where the negative space can look really good and make the shot stand out. I love when I can do something like that. But more typically it’s just wasted pixels and bytes. When you go to share your photo with the internet, and you’re a good person, you’ll resize that down to reasonable dimensions versus the several thousand pixels of width your camera probably provides you. If you leave your photo as-is, the subject is gonna become quite small in that reduced image size. So, enter: cropping. We trim the photo down, almost always resulting in a different aspect ratio, until the subject is filling as much of the new frame size as we prefer. Occasionally, just that act will end up reducing a photo to reasonable dimensions for sharing. But even if not, when you resize down for upload, your subject will still be big and prominent, which is what we want. But it’s not without some potential downsides. One argument here is that you’re not getting everything you possibly can out of your camera’s sensor because you’re essentially throwing away the output of half or more of the pixels. I think that’s a valid point of view, but at the same time with how many thousands of pixels of height cameras give us anyway, you’re not gonna hurt in the end result for that loss.
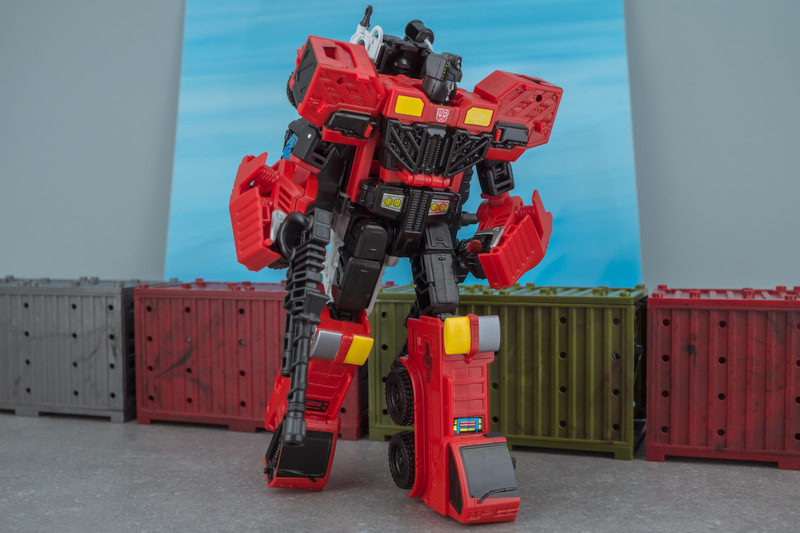
Another angle to look at is that sometimes our background of choice just can’t possibly fill the frame while having the subject fully in view. Let’s take this photo of POTP Inferno I shot:

We’ve got a nice little environment built up around the toy including a background that kind of helps sell the idea. But this is just the end result. Here’s what the original photo looked like.
The “useful” area of the image is comparatively very small, and the remainder only serves to ruin the illusion. If I could find easily, and cheaply available panes of colored glass bigger than a square foot, I might not even have this problem, but that’s a complaint for another day. But you can bet it was obvious at the time of shooting the photo that this was gonna be a crop job one way or the other.
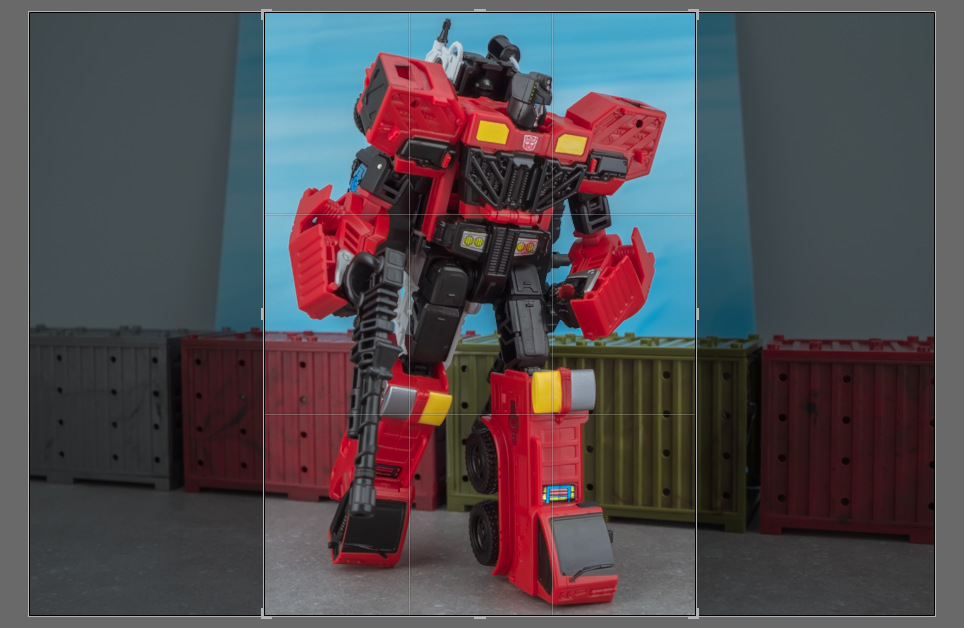
So while I normally would prefer a square crop, in this case I needed to make a concession in order to have the entire subject visible. In this case I abandoned the pretense of a specific aspect ratio in favor of making sure the resultant image size would be just trimmed enough to make sure the surroundings stay out of sight, while maximizing the amount of preferred content. The end result, seen above, turned out pretty nice even for having to compromise a little versus what I might have originally had in mind.
Cropping could be argued as the easier of the two options. So why is that? We definitely should be, if not already are, shooting attached to a tripod, which makes it naturally a lot easier to leave the camera in one place, at one orientation all the time. I do this, everything I shoot for a gallery is done in horizontal. So you take your clean shots taken from a stable position, and now you’re free to play with them at your convenience, and maybe most importantly, have the chance to try out lots of different variations on the new composition you end up with while you use the cropping tool. See, for me photography is something of a reductive process: I’ll start with more than what I need, and slowly cut down to the finished product. You can always take away, but you can’t add more. So having the extra space to the sides, and sometimes even top and bottom, I get a lot of post-processing flexibility. If I shoot a photo and go to edit and decide I was off my nut in how I had it framed …or maybe just made a small, natural error like being off-center or even tilted a bit, having extra space around the subject gives me a lot of flexibility to fix those things. And yes, to a degree even change the framing and composition if I decide my original intent isn’t really working out. It’s a great safety mechanism to have. This early version of a photo from the Novastar shoot is a good example:
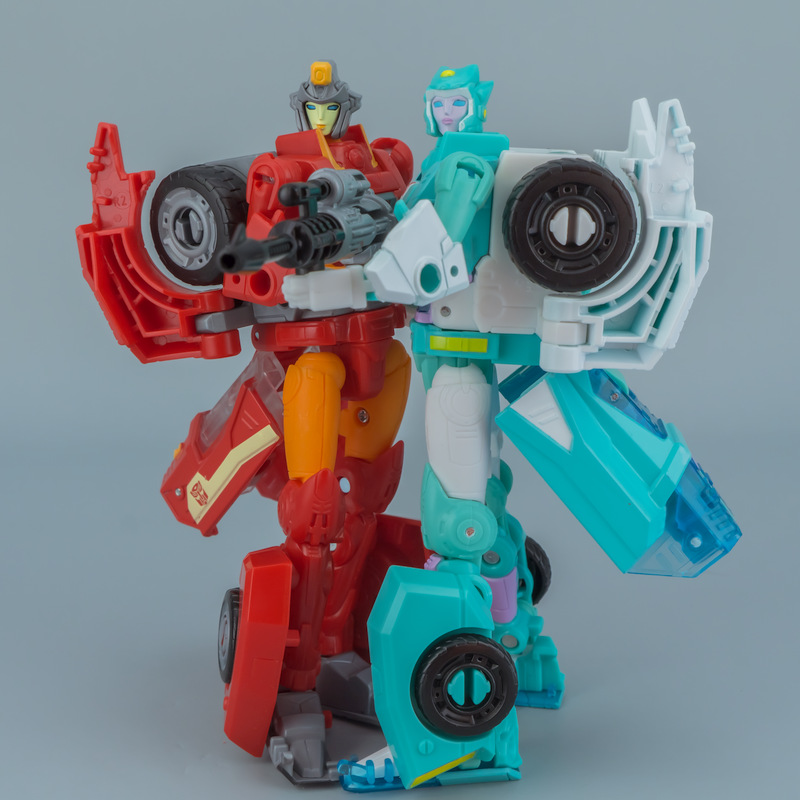
Here I was able to square it up the way I prefer, which also happened to be a good form for filling the frame with the subjects, since they have backpacks and such sticking out adding width. It was reduced from the original as shown:
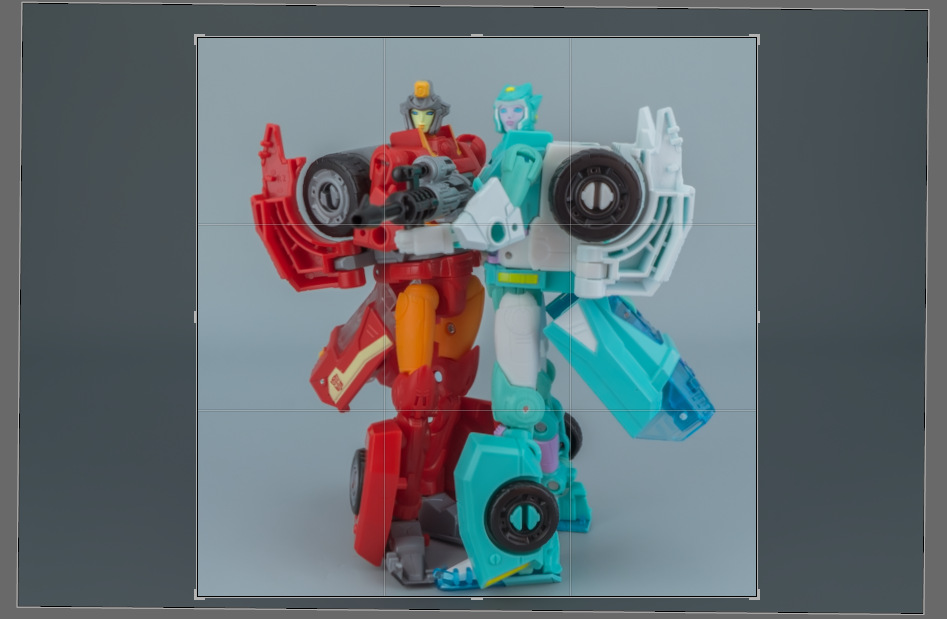
So here you can see that in addition to cutting out empty space, I took advantage of the space around the subjects to correct a slightly skewed alignment so the toys wouldn’t look lopsided. I have to do that more than I’d care to admit! But apart from that, there’s nothing specifically wrong with the original form of the photo that demands being cropped, but doing so helps to bring all attention to the toys, and drop some data that isn’t really required.
Composition change is the other approach, and in this context when I talk about changing composition, I mostly mean going vertical with the camera. Again, this applies mostly to things like action figures or other things that are much taller than they are wide. Most full height tripods have a way for you to hold the camera vertically, so it doesn’t need to be a difficult change. Smaller tripods like tabletop ones will have a harder time with that because they’re not meant to support all that camera weight on one side. Depending on the weight of your camera, there are other possibilities for a stable mount that can go vertical while mostly staying on a tabletop level. I have some clamp-style mounts made by Joby that have articulated connectors which could attach to the edge of a table and then be positioned to let something like a point and shoot camera go vertical and be as stable as a tripod. Something in the mirrorless or DSLR weight class might require some more creativity or specialized gear.
So by whatever means you get to a stable camera in vertical orientation, now when you frame up on that tall subject, you’ll have far less empty space on the sides. In fact, sometimes you might be forced to leave empty space at the top or bottom in order to accommodate with subject’s width. But in principle, you’ll be filling much more of the frame, and thus utilizing a lot more of the pixels on the sensor to capture your image. This has the potential to result in more detail in an image, and certainly will output a bigger image of your subject than you get after cropping from horizontal. But I come back to my previous answer of that you probably don’t need it, especially once you resize for sharing. This is a practice that you should be able and ready to do in case you really do need it at some point, but it’s my opinion that for general purpose you’re not going to get that much more out of it to make it worth doing all the time. And if something went slightly wrong when you shot the photo, like the framing being a little off, or being at an unintended angle, it’s harder to fix.
Now, let’s talk some more about cropping. For what we’re doing to have any point at all, we have to change the photo’s aspect ratio. That’s another point of contention where I think there’s even less of a “right” answer. I’ve heard arguments about strictly maintaining an equivalent aspect ratio. In practice, that would mean going from a 4:3 horizontal image, and cropping it vertically at 3:4. The rectangle stays the same shape, just with the orientation changed. That can be fine, since it will definitely have you framing in tightly on your subject, which is the point of this anyway. And if your expectation is to deliver your photos to an audience predominantly on mobile devices that are gonna be held in portrait mode, it’s actually pretty good advice. But it’s not advice I adhere to. To me, that’s like trying to pretend everything was perfect out of the camera, and the truth is, that’s never the truth. I like to crop my photos to 1:1 square. It gives me some wiggle room if I decide I want to present something not perfectly centered or whatever the case may be, but it’s still minimizing the dead space, and striking a middle ground for desktop and mobile viewing. But you might decide that you like 3:2, or the portrait equivalent at 2:3 better. Or even go for something like 16:9 and really try to creatively leverage the empty space. There’s not a wrong answer to this question as long as you end up with something you like. I don’t even go 1:1 for every single one of my photos – sometimes there just isn’t enough room and I have to go wider.
What I would recommend regardless of what method you decide you like best is to keep it consistent as much as possible. As an example, I go with 1:1 for the majority of my photos, but when I need to crop to a different ratio, I’ll try my best to keep the photos that can’t be square all the same alternate ratio. In a Transformer shoot, the robot might be all 1:1, a vehicle mode might be 5:4 or even 16:9, and group shots might stay at the original 4:3 and just get the edges trimmed out. But all the shots of one group or type within a gallery batch share an aspect ratio with each other. My feeling is that gives a better viewing experience if the shape of the image doesn’t change dramatically from photo to photo to photo, and it also makes the whole thing look a little more “polished” in general. But that’s just my opinion.
There’s different ways to handle composing your shots and framing your subject, before and after you take a photo. How you do that is a decision you have to make based on what best satisfies you when you look at the end product. There’s advantages and disadvantages to either method, and in reality neither way is going to be right for every single situation. But whatever you do, don’t let anyone tell you that you’re doing it wrong, because you’re not.
This article was inspired by a question I was asked by Marc Allie. I hope this, and the thoughts I shared with you at the time prove helpful, Marc!