Wave 2 of Transformers Siege is making its way around the retail space in the United States at a very healthy pace, which means lots of reports about the various figures. And in the case of Ironhide, these reports all commonly reflect one particular factor: The leg panels are barely hanging on at the best of times. But we can fix this!
Ironhide’s lower legs each have two large panels. One wraps around from the front of the shin, and then faces toward the other leg making up much of the structure of the lower half of the leg. The other panel folds down and sits facing outward from each leg. Both of these move via a friction hinge; the type characterized by the lack of a metal pin where nubs at the ends of one side are supposed to fit matching holes on the other piece. In Ironhide’s case, all four of these hinges are barely holding together, resulting in the panels easily pulling off the toy during transformation, or sometimes even in trying to pose the legs. It’s annoying to say the least, and while tolerances can vary (my toy for example will stay together as long as I remember to be a little bit careful; others aren’t as lucky) it’s definitely something we’re going to want to fix as soon as possible.
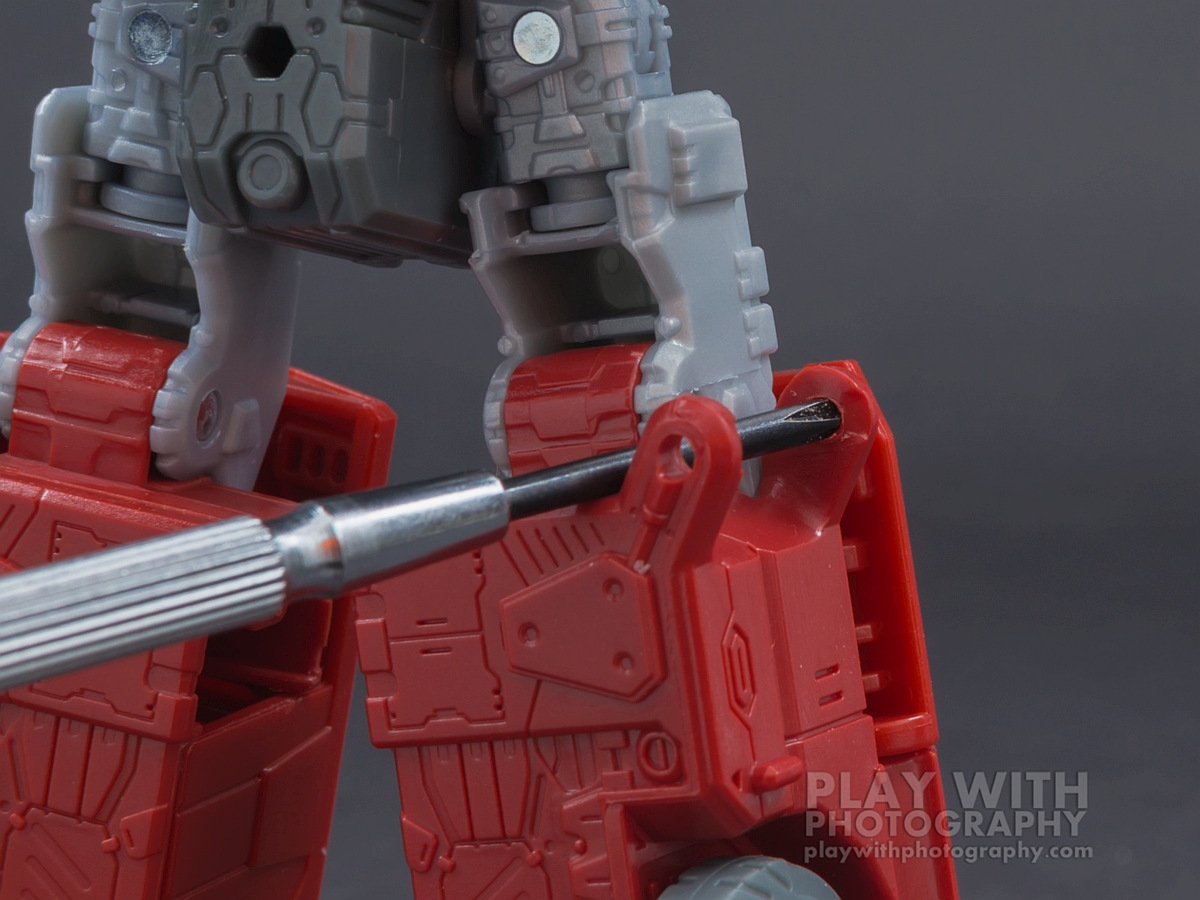
Fortunately the solution could hardly be more simple! There’s a slight mismatch between the size of the nubs and the diameter of the holes they’re supposed to fit – the nubs are too big. It’s only by a little bit, but it does make it difficult or impossible for the hinge to fully engage. Instead of clicking together, the holes are providing a “guide” for the other half of the hinge to suggest where it should be sitting. That’s why it stays in place if you leave it alone. But this ends up pushing apart the outer ends of the hinge, which will only make the problem worse. So, we need to widen the holes.
The fit is a bit screwed up, thus what better to fix it than a screwdriver?
This is not difficult to do, and at most you only need some inexpensive tools that you may very well already have on hand. In my case, I was able to take a “precision screwdriver” set and use the “number 0” phillips-head screwdriver (which looks equal in diameter to the 2mm flat screwdriver in the same set) to carefully scrape the inside of the holes a little bit at a time. The 2mm width seems to be very, very close to the diameter of the holes to begin with, so you will have to come at it a little askew to make progress. But it was quick and easy to remove just a tiny amount of material and almost immediately see an improvement. And I mean TINY amounts of material. When you’re done the changes will probably be almost imperceptible, until you test fit the parts and find them much more snug. The mismatch between them is clearly very minimal.
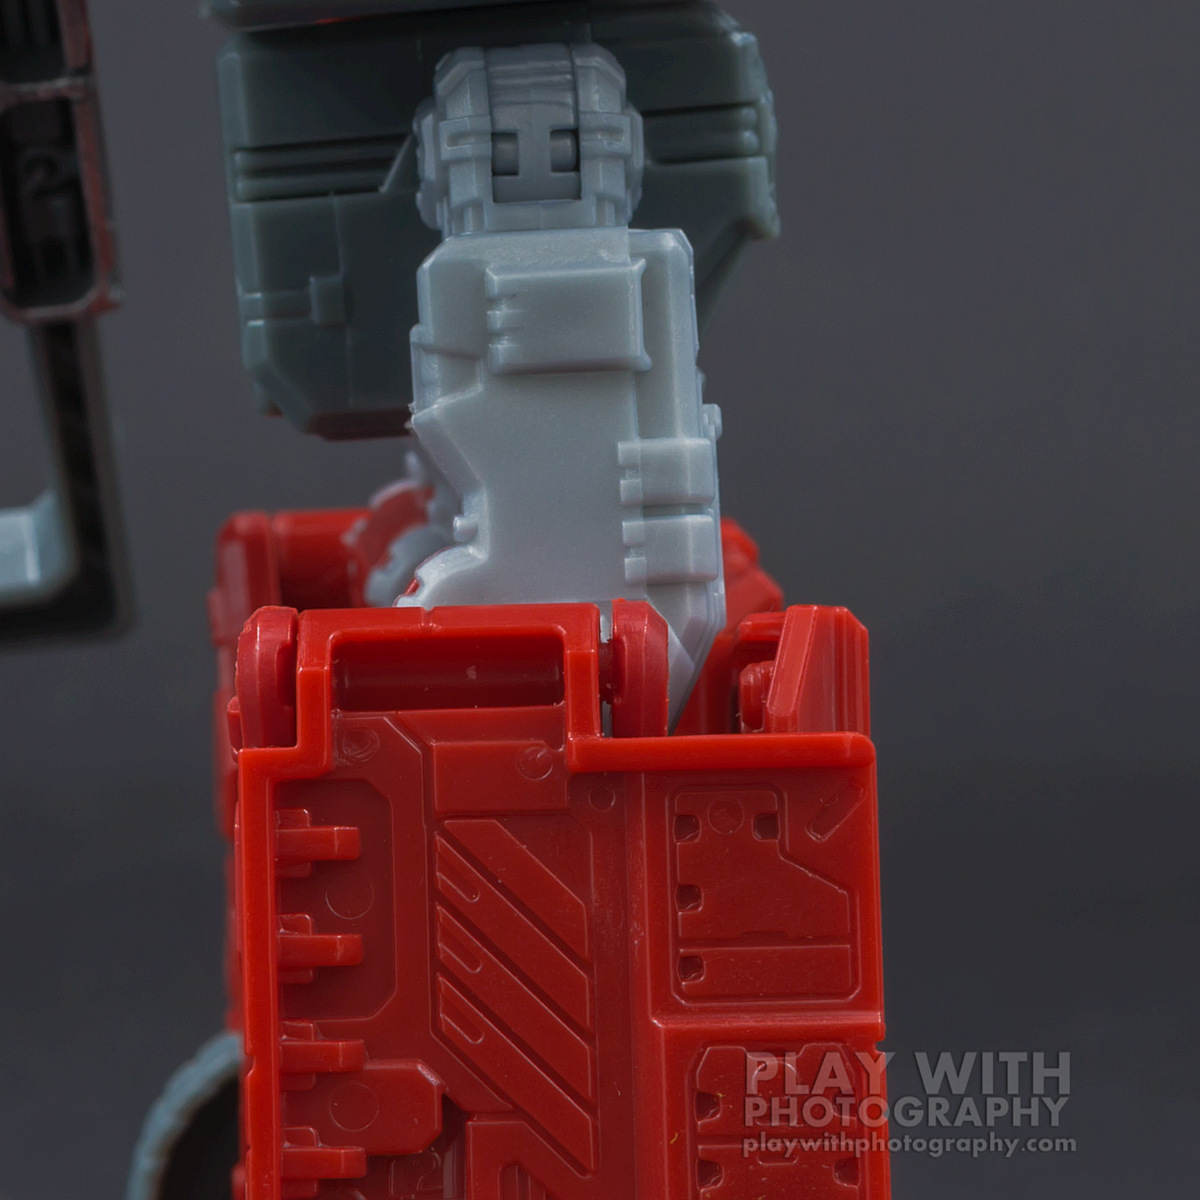
Best of all, where the hinges had been pushed wider than they were supposed to be, they actually start to contract back to their intended shape, which both makes the hinge even stronger, as well as providing visual indications of your result. In less than 5 minutes, one hinge looked virtually perfect on the outside. The other was still a tiny bit pushed out, so I knew I needed to go do a little bit more with that one. The visual cue mostly applies to the outside panels. The front panels don’t give as much visible sign, but you’ll be able to tell by feel each time you test fit the parts back together how much progress you’ve made. When you’ve finished, you’ll find the panels now strongly resist being removed from the toy. Your mission is accomplished!
BeforeAlmost immediately after.
Because so little plastic needs to be removed, and because you don’t need to carve out the entire depth of the hole – just the first millimeter at most, I’d say – this also poses little to no risk of damaging the toy. You’re not cutting so much out that it will lead to stressing or cracking just from the tension of the hinge itself. The screwdriver set like I used costs as little as a few dollars, and can be extremely handy to have around in general. You might even already have one! Just be careful and make sure not to use something wider as your instrument because it’s “close enough”. Getting this right, and not damaging or weakening the plastic does depend on this nearly flush fit where you can work a tiny amount at a time. Careful use of a sharp, narrow-tip hobby knife might get the job done too, but probably leaves you more open to going too far too fast. That, and it’s much harder to accidentally cut yourself with a screwdriver!
If you’ve found this or any of my other content useful or entertaining, please consider taking a moment and showing your support for as little as $2 per month on Patreon. Your contribution helps make more galleries, as well as articles like this one possible, as well as expanding the range of coverage you see here. For just a couple dollars per month, everybody wins!